Time to read: 5 minutes
Time to skim/look at pictures: 1 minute
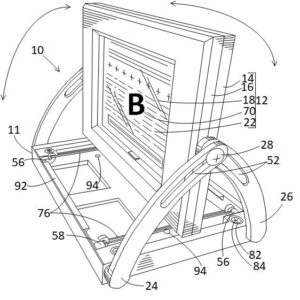
Patent Drawing
The patent process includes submission of enough drawings to completely describe your design. Each part must be numbered and its function and location described. The process is time consuming, but does provide insight into what you might not need in your design. My new design uses about half the parts of this design.
Provisional Patent Application
With my prototype in hand, I worked on my initial Provisional Patent Application (PPA). This type of patent is good for one year and allows you to protect your intellectual property (IP) until you can submit your Non-Provisional Application (NPA) – which is a ‘real’ patent. It took months to prepare and the create the detailed drawings of my prototype (see diagram). I read the ‘NOLO’ book (which I’d recommend) for how to submit the PPA, and after weeks of preparation, submitted my PPA with the protoype design.
In parallel, I worked on my Amazon sellers account. I already had a business (which costs about $50/year in Virginia), which made Amazon registration (and many related business processes) much easier. I created marketing materials and attended several sports cards show to, ‘get the lay of the land’.
I also continued to look for a name for my new product. I looked at dozens of website names before finally settling on flippee.com.The site was not cheap, but I liked that it implied flipping, and that it sounded similar to another successful product – the slinky. This also helped me define what I was designing – a mounted flip frame.
Logo and Branding
A friend of mine is a graphic artist and she helped me work on a logo for the flippee. It was hard to pick from the samples, but in the end, I settled on the ‘twisted F’ design that you see in the bottom right (do you think I made the right choice?). She also provided a color pallet and I continue to use that as part of my branding.
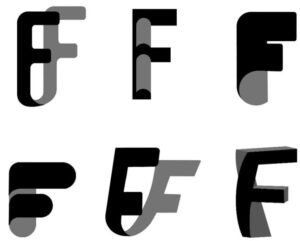
Early Flippee Logos
Prototype Molded Parts
With the IP secured, I worked on finding an injection molding designer. I wrote a statement of work, created a Non-Disclosure Agreement (NDA) and solicited bidders from Upwork, a remote contracting website. I read a book on the process and decided to find an engineer in India because a.) they speak English (my native language), and b.) the compete with China on price.
After a substantial vetting time, I narrowed the list down to 6 qualified vendors, and then narrowed it down to three. I had a second round of questions and then selected an injection mold designer from the US as a consultantant and one from India to do the work. Fortunately, I hit the jackpot and found a great design engineer and friend on my first try.
Injection Molding 101
Injection molding is a lot different than 3D printing and my design needed a lot of editing and re-design for that process. I first watched dozens of youtube videos on injection molding, and then discussed with my engineer the problems I knew from my previous design. There were a lot of difficult problems – and not just differences from my 3D printed version. It was easy to break the existing flippee so a redesign was definitely necessary.
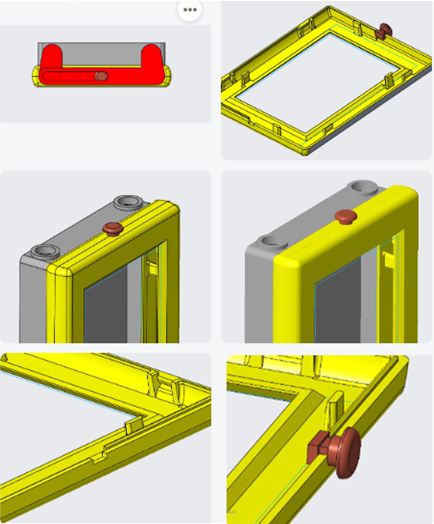
His first drawings back (see drawings) were so different from my original parts that I thought I would need to find another designer. What was he thinking?!
What he was thinking ...
When I reviewed the drawings with the injection molder he calmly explained why he had designed it as he had. I documented the dozens of ‘errors’ that I saw in a ‘Design Review’ (a masked ‘witch hunt’) and one by one he calmly answered why he’d done things as he had. His understanding of my objective was clear and made sense. As we talked though it, he listened to my suggestions and then noted what we could and couldn’t do to get the product to market.
The results of our review gave me confidence that the design was in good hands – in spite of my initial misgivings. It turns out, he just wanted to make something he could easily mold and assemble. While many vendors (including my consultant) had made design changes to accomodate my 3D printed design, this designer had completely redesigned my product. I was dubious until he mentioned that he could assemble the entire frame for about 20% of what I’d estimated. Suddenly, I was all in!
As the weeks and months went on, we regularly discussed changes needed, changes that might improve functionality, and so forth. In all, I expect that we changed over 100 elements over the next few months to accomodate a variety of conflicting design requirements and then …
It was time to cut the molds!

Design Review
Whenever a design changes so much, a design review is needed. The review answered about 40 questions that I had ranging from design details to changes to make the design more robust to modifications that simplify future add-ons (see Coming Soon). Daily conversations smoothed the way for a great design.